Connecting an optogenetics laser to be controlled by EthoVision XT
Last updated: Nov 07, 2025
EthoVision XT can control a laser or LED light source for optogenetics, using time- or behavior-based triggers. For example, stimulation can be activated when the animal enters a specific zone.
Note: EthoVision does not pulse the laser directly. If pulsing (e.g., 20 Hz) is needed, a pulse generator is required. EthoVision can trigger the start/stop of this generator.
Required Components
The full system includes:
- EthoVision XT and its host computer
- Trial & Hardware Control Module
- USB IO Box or Mini IO Box (via USB)
- Laser or high-intensity LED source
- Pulse generator
- Fiber optics, connectors, cannulae (user-supplied)
You will need a TTL cable with an RJ45 connector on one end and a BNC (or compatible) connector on the other, connecting the IO box to the pulse generator (or directly to the laser).
Basic Setup in EthoVision
- In Experiment Settings, enable Use of Trial Control Hardware.
- Click Settings and select the appropriate IO box (USB or Mini USB). For the used TTL port, set Custom Hardware as the device type.
- In Arena Settings, click Arena-Hardware Mapping. Add and assign your device to Arena 1. Repeat for multiple arenas as needed.
- Use the Test function in the Arena-Hardware Mapping window to confirm connectivity:
- Output 1 High – Turns device ON
- Output 1 Low – Turns device OFF
Pulse Generator Configuration
Most pulse generators respond to a 5V TTL signal. Settings vary by model:
Pulse Mode: Fixed-duration pulse train
- Prizmatix Pulser: “Execute pulse sequence each time after trigger(s)”
- AMPI Master-8/9: “Train”
- Agilent Waveform Generator: “Triggered Burst Mode”
Gate Mode: Continuous pulse during trigger HIGH
- Prizmatix Pulser: “Execute pulse sequence after trigger HIGH, stop when LOW”
- AMPI Master-8/9: “Gate”
- Agilent Waveform Generator: “External Gated Burst Mode”
- Plexon PlexBright: “Edge Digital Input” (Use one trigger input for ON, another for OFF)
Trial Control Settings in EthoVision
Use the Trial Control feature to define stimulation timing. Events are shown as a flowchart:
Example: Simple timed stimulation (5 min pre-stim, 1 min stim, 5 min post-stim):

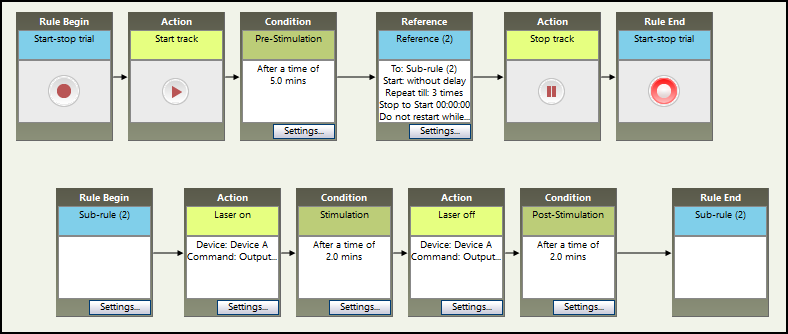
Repeated Stimulation
To repeat events, use a Sub-Rule loop:
- Pre-stimulation: 5 minutes
- Sub-rule: 2 min ON, 2 min OFF, repeated 3 times
Zone-Based (Place Preference) Stimulation
Stimulation starts/stops depending on the animal's zone (e.g., Left = ON, Right = OFF). The sub-rule runs continuously, and a time limit controls total duration:

Additional Triggering Options
Triggers for stimulation are not limited to zones. You can also use:
- Activity level
- Velocity
- Turning angle
- External sensors (e.g., lever presses, nose pokes)
This allows for highly flexible behavior-based stimulation and inhibition protocols.