Setting up the CatWalk XT 10 walkway: calibration and detection settings
Last updated: Aug 24, 2026
Setting up the walkway for use is a three step process: defining the walkway, calibrating, and detection settings. These steps are not difficult but can make a big difference for the quality of data and how much work you will need to do in the classification, so it’s worth getting right.
In addition to the initial set-up, you need to:
- Define the walkway whenever the camera height or walkway wall positions are changed (e.g., to make a wider or narrower corridor).
- Calibrate the walkway whenever the camera height is changed.
- Adjust the Detection Settings whenever the lighting in the room is significantly changed, when the camera height is changed, or when switching between different groups of animals with significantly different weights.
Defining the walkway
This step tells CatWalk which part of the image to look at; it simply defines which part of the walkway is the working area. You will need to define the walkway any time you raise or lower the camera, or if you make the walkway wider or narrower.
In the image, you’ll see the bottom edge of the two corridor walls. The defined walkway should be just within those boundaries. Try to minimize the amount of the black bottom edge of those walls that is within the rectangle.
Calibrate the walkway
Calibration tells CatWalk the size of the image so that results can be reported in real units (cm) and not pixels. You’ll need to redo the calibration if you move the camera up or down.
For the calibration, you will want a calibration sheet. You should have one, but there is also a printable calibration sheet in the manual or you can download it below. It has a rectangle which is 10x20 cm in size. Place it on the walkway, face down, so the rectangle is in view from the camera. Go on the menu to Setup/Calibrate Walkway. If the image is not in focus, adjust the focus on the camera lens. Move and resize the white rectangle on the screen to align with the rectangle on the calibration sheet. Click OK. The calibration is done.
Download the printable calibration sheet, US letter sized.
Download the printable calibration sheet, A4 sized.
Make sure to print the calibration sheet exact size, not scaled!
Detection settings
The final setup step is the Detection Settings. In this step, you will set the sensitivity (gain) of the camera so that prints can be detected and distinguished from noise. Redo the detection settings if the lighting is different in the room (e.g. due to different positioning of the computer monitor, different room size, amount of light coming under the door, etc), if the camera has been raised or lowered, or if you are working with significantly lighter or heavier animals.
When setting up the detection settings, the room must be dark, with the same lighting you will use during trials. The ceiling on the walkway should be lowered. You will need at least one animal that is approximately the size and weight of your typical subjects. The walkway should be on for at least 15 minutes before you set the detection settings or perform trials (because the lights will gradually brighten during the first 15 minutes).
Go on the menu to Setup/Detection Settings.
When setting up from scratch, we recommend first using Auto Detection, then making fine adjustments manually. If your lighting is already very similar, you can also skip the Auto Detection.
To use Auto Detection, click the Start Auto Detect button. Place your animal on the walkway and allow it to run across (with some encouragement if necessary). After the animal has moved across the image, CatWalk will adjust to recommended settings. In some cases it may require the animal to cross a few times before auto detection is complete. This will usually get you good settings, but you should still check them and you may be able to improve them further.
When adjusting manually, your goal is that when the animal runs across the walkway, without stopping, the Maximum Green Intensity (shown in the center) should be in the range 200-205. You can click the Reset Prints button to clear these values to get another reading. If the animal stops in the middle, you will get a higher Maximum Green Intensity reading – don’t worry about that, just click Reset Prints and wait for the animal to cooperate. The reading you want is one in which the animal kept moving all the way across. You can repeat this as many times as necessary.
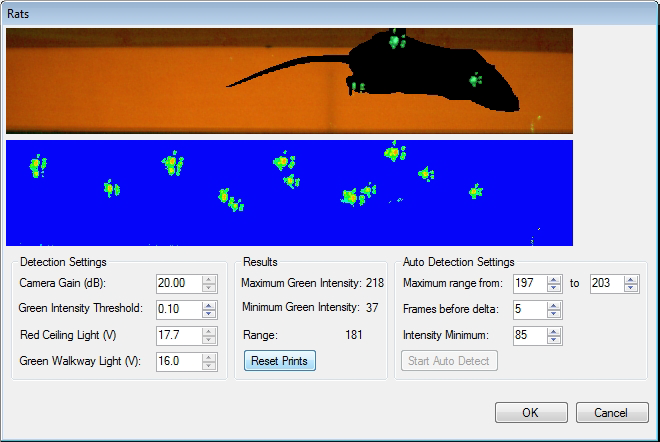
If the Maximum Green Intensity is too high, lower the Camera Gain (this decreases the sensitivity of the camera). If the Maximum Green Intensity is too low, raise the Camera Gain (increasing the sensitivity of the camera). Then wait for the animal to make another run. Repeat until you feel confident you are in the range 200-205.
If the Camera Gain is very high (>20), you may get a lot of noise. If you are using CatWalk XT 10.6 (but not earlier versions), you can increase the brightness of the walkway lights (the Green Walkway Light setting) which will allow you to use a lower Camera Gain. The default settings are 16.5 volts for mice and 16.0 for rats. Only small adjustments are needed here, adjust by 0.1 increments.
After the Camera Gain is set, adjust the Green Intensity Threshold. A higher value will filter out more noise but if it’s too high, you will lose details around the paw prints. A lower value will get more of each print but if too low will pick up noise that is not part of the prints. Adjust this to remove other noise but still getting a clear image for each print.
Then click OK, you are finished.